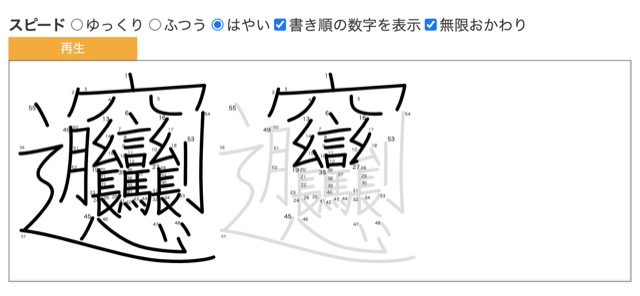
かきかたプリントメーカーに「書き順アニメーション」という機能を実装した。

これを作る際に使ったテクニックを紹介する。スクリプトは不要。純粋なSVGだけで次ようなアニメーションが作れる。
(2021/06/16追記 : アニメーションSVGの貼り過ぎでスマホだとめちゃくちゃ重かったり表示されなかったり遅延が発生したりします。すみません。)
SVGに「線を途中まで書く」という機能自体はない。そこでちょっと工夫が必要になる。
テクニックの概要はこんな感じだ。
「ものすごく荒い破線で線を表示し、破線のオフセットがちょっとずつ変化するようにする」
ステップ0 : 破線を使って「書きかけの線」を作る
こちらはベジエ曲線1本で作った「の」である。
ソリッドな線で表示される。SVGのソースはこんな感じだ。
<?xml version="1.0" encoding="UTF-8" standalone="no"?>
<svg
   xmlns:rdf="http://www.w3.org/1999/02/22-rdf-syntax-ns#"
   xmlns:svg="http://www.w3.org/2000/svg"
   xmlns="http://www.w3.org/2000/svg"
   version="1.1" viewBox="0 0 320 320" height="320" width="320">
  <g
     id="layer1">
    <path
       id="path835"
       d="M 162.75027,47.594166 C 161.30551,192.79327 95.784567,334.58736 45.001747,275.14501 -14.979591,204.93557 23.330239,54.095619 162.02789,36.036029 304.5807,17.474467 355.6267,205.79618 234.26625,293.20458"
       style="fill:none;stroke:#000000;stroke-width:4px;stroke-linecap:round;stroke-linejoin:miter;" />
  </g>
</svg>
<path>タグが「の」の本体だ。これを破線にしてみる。線のstyleにstroke-dasharray属性をつけることで破線の間隔を指定できる。
値を大きくすると破線が荒くなっていく。これに更に破線のオフセットを変更することができる。破線の開始ポイントが調整できるということだ。stroke-dashoffset属性の値を変えてみると……
「の」の字の書きはじめの所がちょっとずつズレているのがわかると思う。
さて、この破線の間隔 (stroke-dasharray) を「の」の字の長さと同じくらい長くする。ここでは1000にしてみた。そして、オフセット (stroke-dashoffset) を変化させていく。
オフセットを変化させることで、書きかけの「の」を作り出すことができた。
ステップ1 : アニメーションする
「書きかけ」の状態を作ることができたので、今度はこれを動かす。<path>タグの中に<animate>タグを入れることで、特定の値をちょっとずつ変化させることができる。今回やりたいのは、stroke-dashoffsetの値をだんだん小さくして最終的に0にするという動き。
<path>のstroke-dasharrayの値を1000にした上で、子要素として次のように<animate>タグを追加する。
    <path
       id="path835"
       d="M 162.75027,47.594166 C 161.30551,192.79327 95.784567,334.58736 45.001747,275.14501 -14.979591,204.93557 23.330239,54.095619 162.02789,36.036029 304.5807,17.474467 355.6267,205.79618 234.26625,293.20458"
       style="fill:none;stroke:#000000;stroke-width:4px;stroke-linecap:roundd;stroke-linejoin:miter;stroke-opacity:1;stroke-dasharray:1000;" class="animated-path">
       <animate attributeName="stroke-dashoffset" values="1000;0" begin="0" dur="1s" repeatCount="indefinite" />
    </path>
<animate>タグの各属性の意味は次のとおり。
- attributeName : 対象となる属性。ここではstroke-dashoffsetを変化させたい。
values: 値をいくつからいくつまで変化させるか。ここでは16から0となっている。 - dur : durationの略。どれだけの時間をかけてその変化が起こるか。
- repeatCount : 繰り返す回数。indefiniteを指定すると無限に繰り返す。
何が起こっているのかわかりやすいように、点線の間隔を小さくしてみたものがこちら。
animateタグについて詳しいことは次のドキュメントを読むと良い。「SVGの構成要素のさまざまなパラメタをちょっとずつ変える」ための基本となるタグである。
ステップ2 : 1画ずつアニメーションするようにタイミングを指定する
ここまでで取り扱った「の」の字は1画で書ける。線1本をアニメーションさせればいい。2画以上の文字を1画ずつ書いていくためには、アニメーションの開始タイミングを調整する必要がある。そこで今度は「あ」の登場。3つのpathから成り立っている。
<?xml version="1.0" encoding="UTF-8"?>
<svg
   xmlns:rdf="http://www.w3.org/1999/02/22-rdf-syntax-ns#"
   xmlns:svg="http://www.w3.org/2000/svg"
   xmlns="http://www.w3.org/2000/svg"
   version="1.1" viewBox="0 0 320 320" height="320" width="320">
  <g id="layer1" style="fill:none;stroke:#000;stroke-width:4px;stroke-linecap:round;stroke-linejoin:miter;stroke-opacity:1;">
    <path d="M 68,93 C 134,94 201,80 233,73">
    </path>
    <path d="m 148,30 c -16,95 -12,202 4,257">
    </path>
    <path d="M 202,124 C 186,199 126.5329,294.64235 85,284 42.077297,273.00153 50.913695,215.5525 79,187 c 22.89599,-23.27603 97,-67 166,-28 69,39 24,126 -51,138">
    </path>
  </g>
</svg>
さきほどの「の」で使ったようなanimateタグをすべてのpathにつけてみる。
    <path d="M 68,93 C 134,94 201,80 233,73">
      <animate id="stroke0" attributeName="stroke-dashoffset" values="1000;0" begin="0" dur="2s" repeatCount="indefinite" />
    </path>
    <path d="m 148,30 c -16,95 -12,202 4,257">
      <animate id="stroke1" attributeName="stroke-dashoffset" values="1000;0" begin="0" dur="2s" repeatCount="indefinite" />
      <set attributeName="stroke-dashoffset" to="1000" begin="stroke2.end" />
    </path>
    <path d="M 202,124 C 186,199 126.5329,294.64235 85,284 42.077297,273.00153 50.913695,215.5525 79,187 c 22.89599,-23.27603 97,-67 166,-28 69,39 24,126 -51,138">
      <animate id="stroke2" attributeName="stroke-dashoffset" values="1000;0" begin="0" dur="2s" repeatCount="indefinite" />
    </path>
全部同じタイミングでアニメーションが始まってしまう。
これではまずいので、アニメーションのタイミングを設定しなければいけない。準備としてanimateそれぞれに stroke0 〜 stroke2というidを付与し、次のように変更してみる。
    <path d="M 68,93 C 134,94 201,80 233,73">
      <animate id="stroke0" attributeName="stroke-dashoffset" values="1000;0" begin="0;stroke2.end" dur="1s" fill="freeze" />
    </path>
    <path d="m 148,30 c -16,95 -12,202 4,257">
      <animate id="stroke1" attributeName="stroke-dashoffset" values="1000;0" begin="stroke0.end" dur="1s" fill="freeze" />
      <set attributeName="stroke-dashoffset" to="1000" begin="stroke2.end" />
    </path>
    <path d="M 202,124 C 186,199 126.5329,294.64235 85,284 42.077297,273.00153 50.913695,215.5525 79,187 c 22.89599,-23.27603 97,-67 166,-28 69,39 24,126 -51,138">
      <animate id="stroke2" attributeName="stroke-dashoffset" values="1000;0" begin="stroke1.end" dur="1s" />
    </path>
今度は1画ずつ順番に書くようになった。
まずは3画目から説明する。id=”stroke2″ の animateタグは次のような内容になっている。
    <path d="M 202,124 C 186,199 126.5329,294.64235 85,284 42.077297,273.00153 50.913695,215.5525 79,187 c 22.89599,-23.27603 97,-67 166,-28 69,39 24,126 -51,138">
      <animate id="stroke2" attributeName="stroke-dashoffset" values="1000;0" begin="stroke1.end" dur="1s" />
    </path>
begin=”stroke1.end” というところがポイント。id=”stroke1″ のアニメーションが終わったタイミングでアニメーションを開始するという意味だ。
次に、最初の線、id=”stroke0″ を見てみる。
    <path d="M 68,93 C 134,94 201,80 233,73">
      <animate id="stroke0" attributeName="stroke-dashoffset" values="1000;0" begin="0;stroke2.end" dur="1s" fill="freeze" />
    </path>
begin=”0;stroke2.end” というのは、0秒後とstroke2のアニメーション完了後にスタートするという意味。この1本の線のアニメーションを開始しないと何も始まらないので “0” を指定する必要がある。そして、3画すべて書き終わった後に再度スタートするために “stroke2.end” が必要になる。
fill属性は、アニメーションが終わった後にどうするかを指定している。”freeze” を指定すると、アニメーション終了時の状態を維持する。fill=”freeze” をつけないと、アニメーション開始前の状態に戻ってしまう。すなわち線が消えてしまう。
2画目がちょっと複雑。
    <path d="m 148,30 c -16,95 -12,202 4,257">
      <animate id="stroke1" attributeName="stroke-dashoffset" values="1000;0" begin="stroke0.end" dur="1s" fill="freeze" />
      <set attributeName="stroke-dashoffset" to="1000" begin="stroke2.end" />
    </path>
animateタグは、1画目 (id=”stroke0″) のアニメーションが終わった後に開始するという内容になっている。
その次にある<set>タグがポイント。これは、何らかのタイミングで属性値をセットするためのタグ。セットするタイミングとして begin=”stroke2.end” を指定しているが、これは、id=”stroke2″ の線のアニメーションが終わったタイミングでstroke-dashoffsetの値を1000にする (アニメーション開始前の値に戻す) という意味。これをやらないと、3画目が終わったタイミングでこの線だけが残ってしまう。画数がもっと多い場合、最初と最初以外の線は同様にする。
begin属性について詳しいことはこちらのドキュメントに書かれている。
この要領で、複数の線で構成される図形を1本ずつ書いていくアニメーションが作れるようになる。実際かっこよく見せるためには、線の長さに応じて破線の間隔を変えるなどの調整が必要になる。「かきかたプリントメーカー」の「書き順アニメーション」でも、今回紹介した方法によるアニメーションに加えて、薄い文字を「なぞる」ように見せたり、数字で画数を表示したりと色々なことをやっている。
(2021/06/28追記) 「ビャンビャン麺」と書き続けるだけのページができました。無限ビャンビャンできます。
